Cilium and hubble


This is not simple content and you will need some time to setup a Kubernetes cluster with cilium and hubble. If you get stuck, that is normal. I got stuck along this journey many times. It might also be that my description and samples are not the best. Take your time and read the official cilium documentation when you get stuck. It is well written and goes into way more detail.
To know what is going on in your container network and to control the flow of traffic we need tools that are well integrated into the stack. Cilium and hubble are tools that provide many options to control flows and to observe what is happening.
What is cilium?
Cilium is a container network interface plugin to provide eBPF-based networking, observability and security. I will not go through eBPF and what it is in detail. For more information the ebpf.io website is an excellent source of information.
What is hubble?
Hubble allows us to monitor the network behavior of cilium managed Kubernetes pods. It will allow us to troubleshoot network connectivity issues when we are trying to lock down containers as much as possible.
In this post I will go through
- locking down a container and
- debugging connection issues.
Target (simplified) architecture
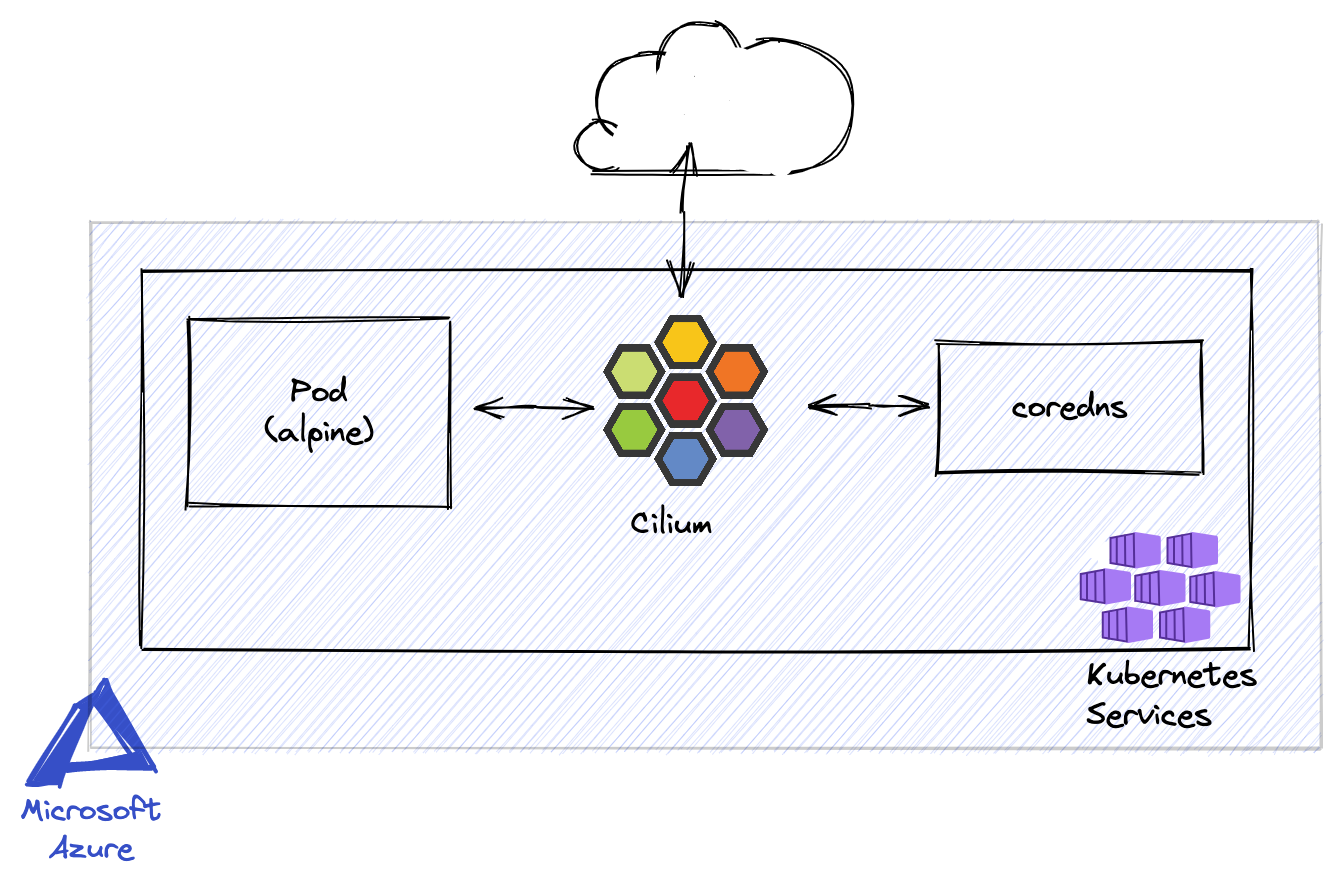
eBPF-based Networking, Observability and Security
In advanced Kubernetes setups requirements for the networking stack become more advanced. There is an increased need for observability and security. Container runtimes use container network interface (CNI) plugins to create network interfaces for the containers.
There are multiple CNI plugins like
Some of the customers I work with use Cilium. To get a better understanding it helps myself to take this plugin for a test drive.
Setting up Cilium and Hubble on AKS
The Cilium documentation has instructions on how to setup it up. The steps I took are as follows:
- Bring your own CNI plugin with Azure Kubernetes Service (AKS)
- Install Cilium with Helm, select AKS (BYOCNI)
- Setup hubble
When I first got started I had no clue what happened under the hood or how to know if everything is setup correctly. To make sure everything is working the documentation includes validate steps. Make sure to run through those sections.
A container for some experiments
For the first steps we just need a container with a small footprint. I like to use an alpine image for this purpose. From here on I am assuming that you have configured kubectl to work with your cluster. I am running everything in the default namespace.
# run on local machine
# This will run a pod and allocate a tty to play around

# Note: The label "app" is important we will be using that
# later to target this pod
kubectl run -it alpine --image=alpine --labels="app=alpine"
You are now attached to the pod and can run any command available. Let's run a first simple test to check if our DNS is working. If you get disconnected from your pod you can use kubectl attach to reattach to the pod.
# Reattach to the container
kubectl attach alpine -c alpine -i -t
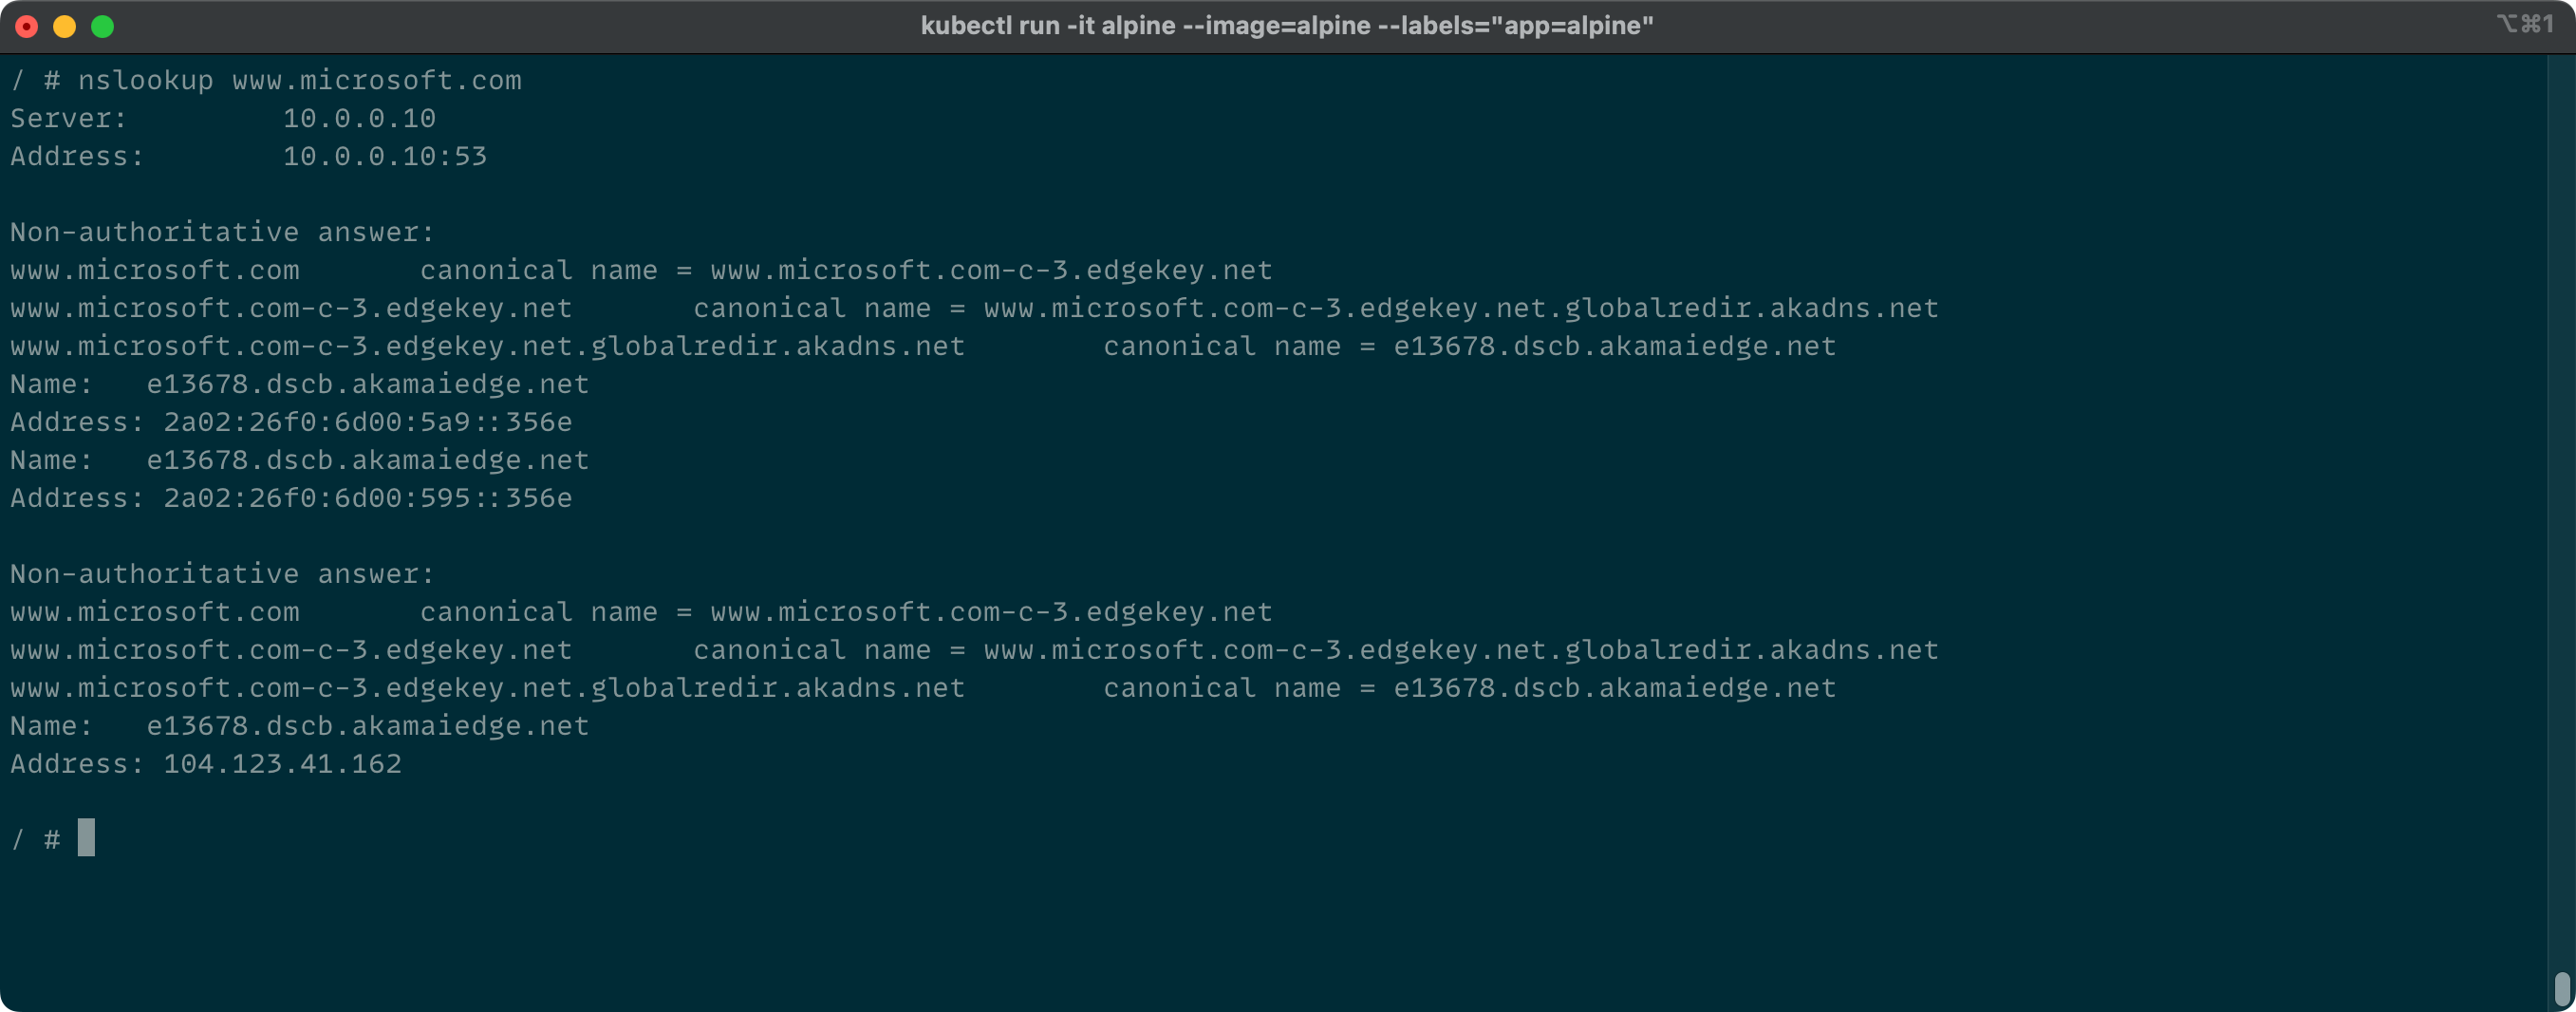
Nice! Getting a response and the name could be resolved. Now we make sure that we can do a HTTP GET request and get a response with status code 200. This status code will indicate a successful HTTP request to the server. To execute the request we need a command to do this. I usually use cURL for that. To install run the following command in the container.
# run in pod
apk add curl
Now we can use cURL. I am only interested in the status code. With the -I option we will only see the headers, that is enough.

Again, this is looking good. Our pod can communicate to the outside world of our cluster. It can actually connect to anywhere in the world.
The container keeps running even when we exit the tty. To reattach to that container we can use
Locking down the container
Locking down the container can be achieved with a cilium network policy. To get started we apply the following basic policy. It only has a name locking-down-alpine and the name of the pod we want to target. By default if no rules are applied, everything is allowed.
apiVersion: "cilium.io/v2"
kind: CiliumNetworkPolicy
metadata:
  name: "locking-down-alpine"
spec:
  endpointSelector:
    matchLabels:
      app: alpine
# run on local machine
# applying the policy
kubectl apply -f ./locking-down-alpine.yml
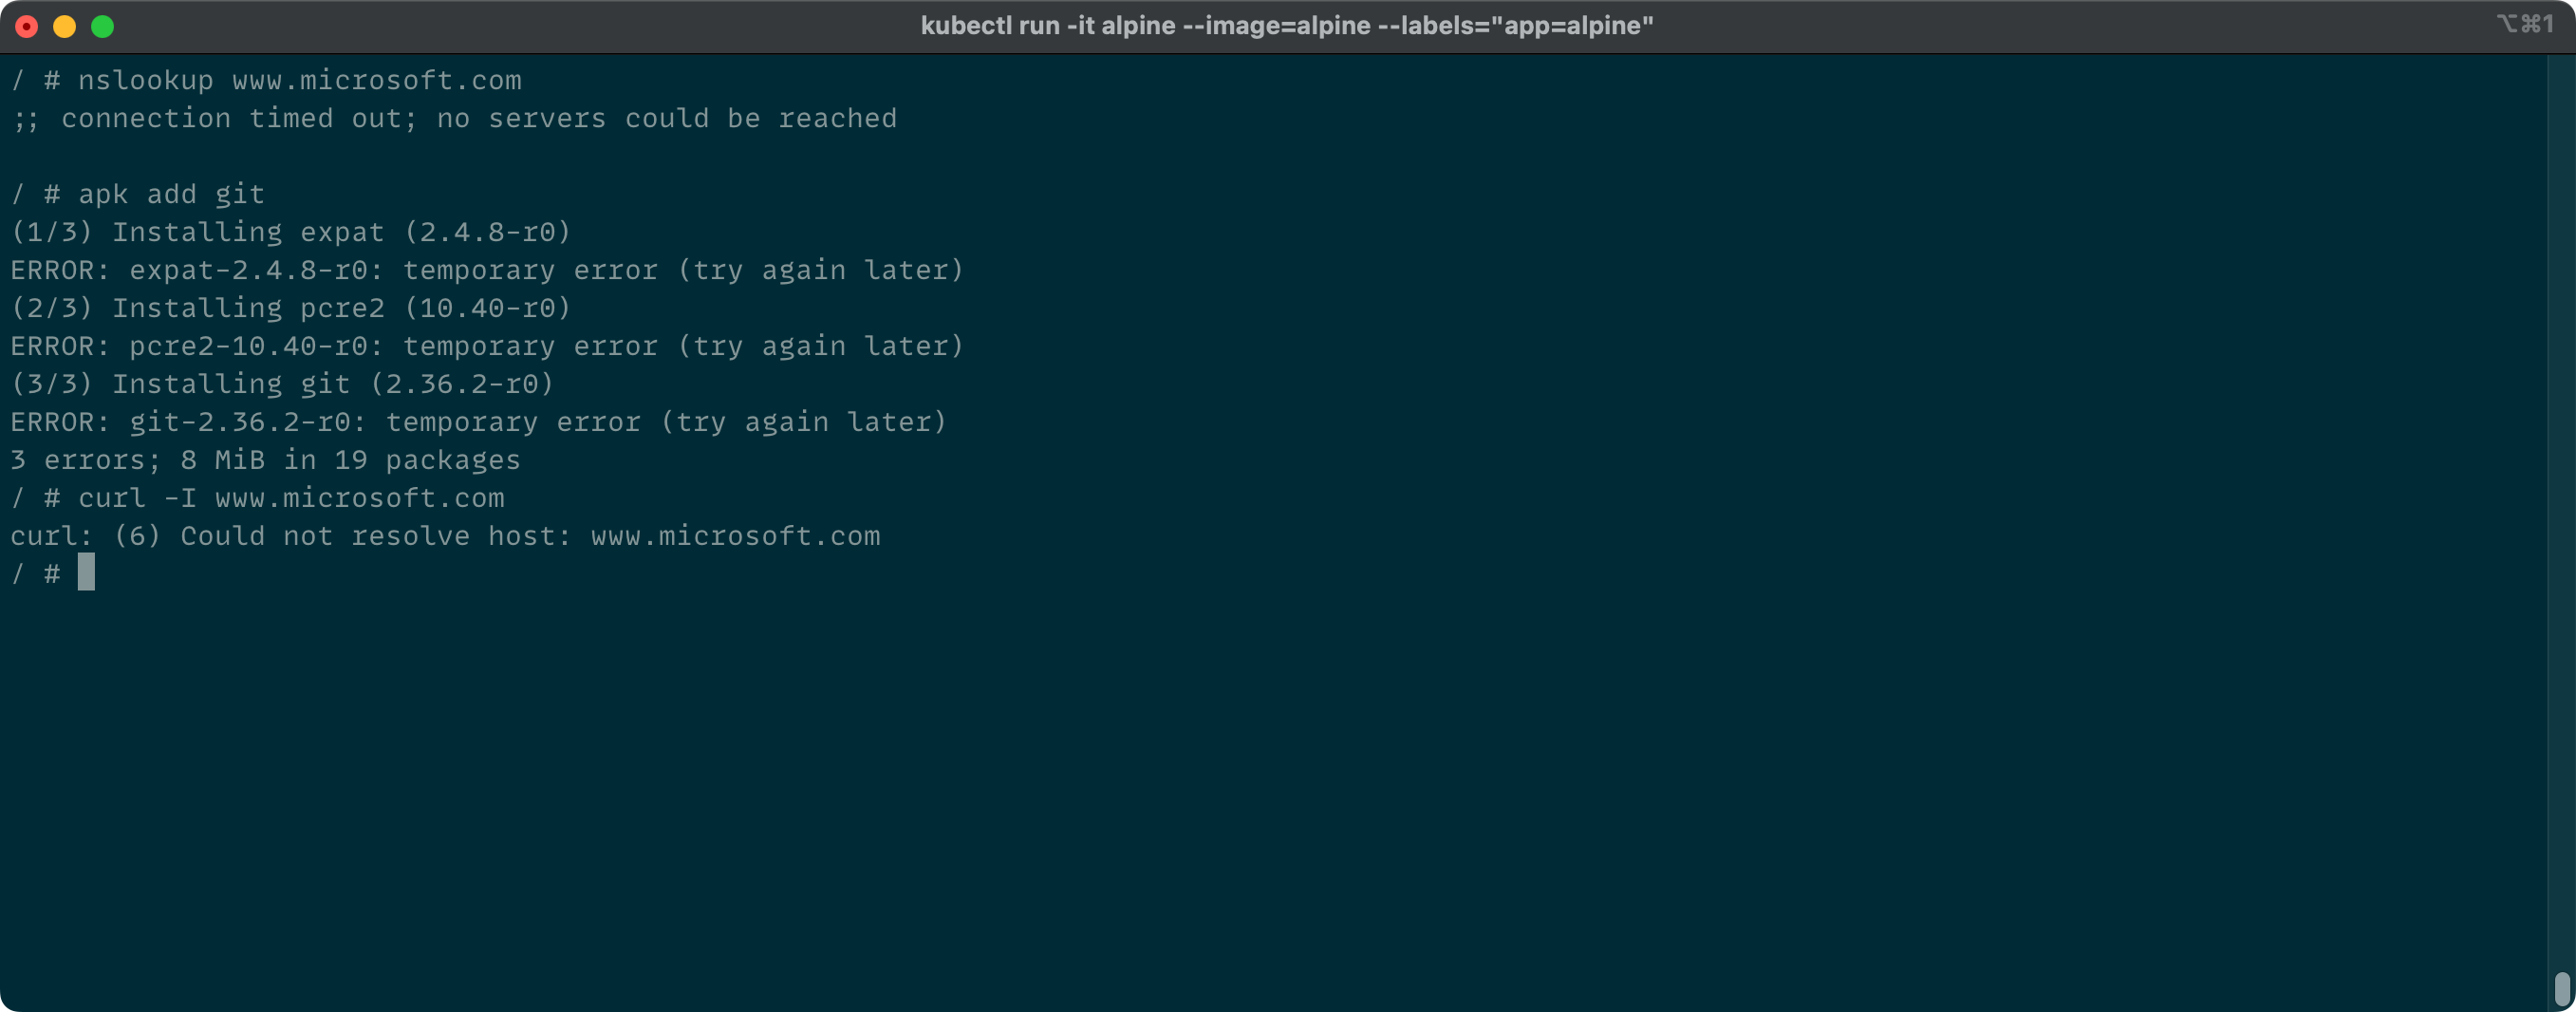
Deny everything
By defining empty ingress and egress definitions we deny all traffic to and from the pod.
apiVersion: "cilium.io/v2"
kind: CiliumNetworkPolicy
metadata:
  name: "locking-down-alpine"
spec:
  endpointSelector:
    matchLabels:
      app: alpine
  egress:
    - {}
  ingress:
    - {}
If you try to run nslookup, apk add or curl -I you will get timeouts or similar error messages
Allow DNS
So first, let's check how to find out to which service the pod wants to talk to. To use hubble to observe traffic
we forward hubble's port to our machine. Run the following command on your local machine
# Run on local machine
# I like to run the port-forward as a process in the background, hence the & at the end
cilium hubble port-forward &
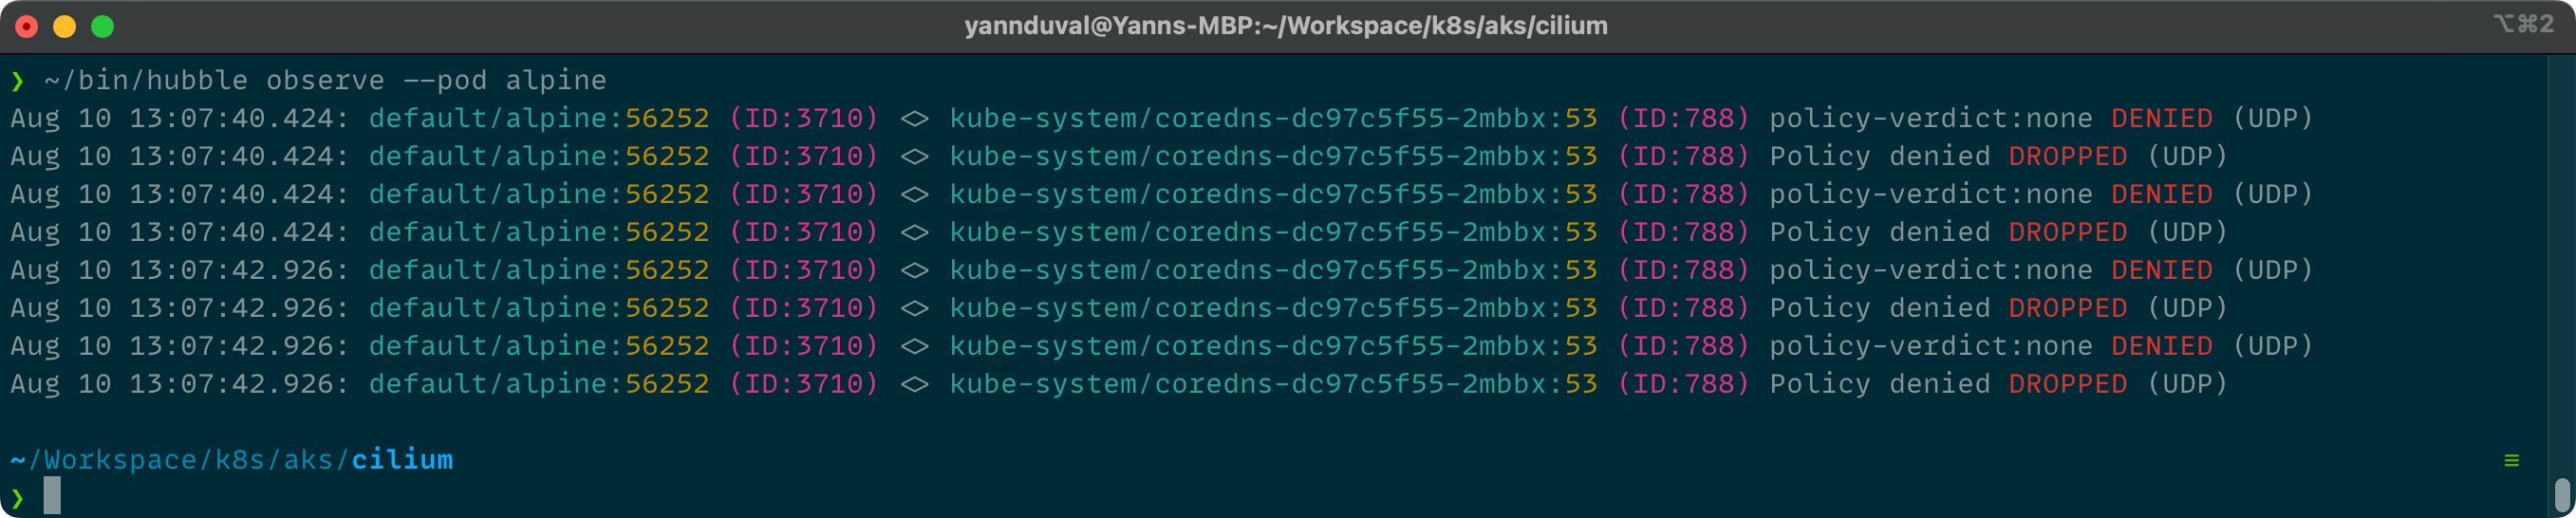
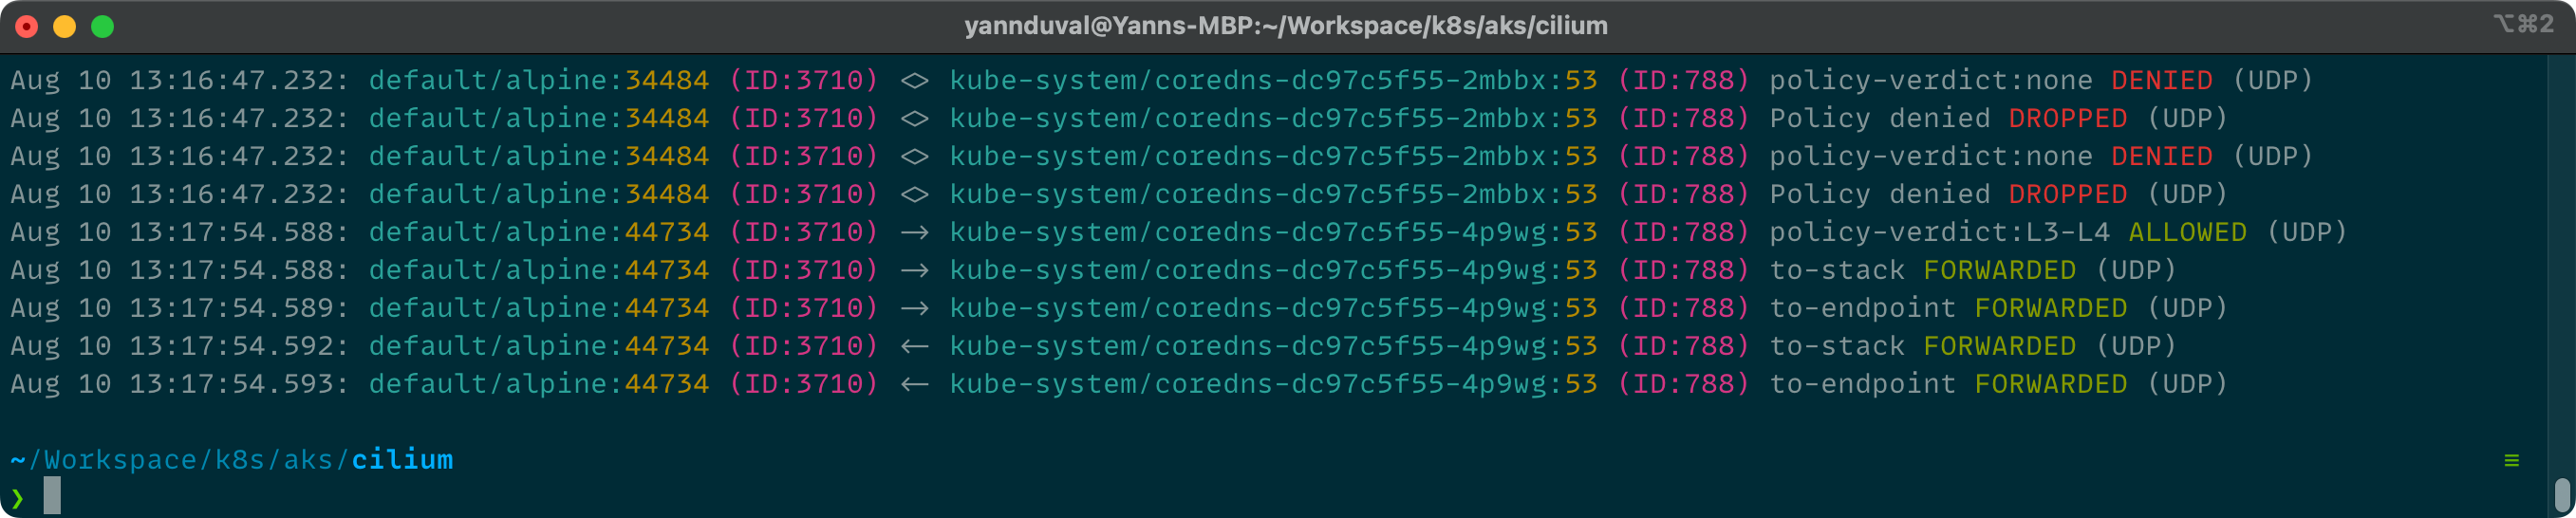
Now, in the container we try another nslookup www.microsoft.com. And now we observe what happened using hubble.
hubble observe --pod alpine
And depending on your configuration the visualization might differ. This is telling us that our alpine pod in the default namespace is trying to talk to the coredns service in the kube-system namespace. The port we want to talk to with coredns is 53 (the port for DNS) and the protocol used is UDP. It might not look like much but when you are investigating connection issues this is a lot of information that we are getting here.
Let's adjust the egress rule for our pod.
apiVersion: "cilium.io/v2"
kind: CiliumNetworkPolicy
metadata:
  name: "locking-down-alpine"
spec:
  endpointSelector:
    matchLabels:
      app: alpine
  egress:
  # Allow traffic from our endpoint alpine to the endpoints
  - toEndpoints:
    # that match the following criteria
    - matchLabels:
        # have a label 'k8s:io.kubernetes.pod.namespace' with value 'kube-system'
        "k8s:io.kubernetes.pod.namespace": kube-system
        # and a label 'k8s:k8s-app' with value 'kube-dns'
        "k8s:k8s-app": kube-dns
    # and uses the following ports
    toPorts:
      - ports:
        # port 53 and protocol UDP
        - port: "53"
          protocol: UDP
  # Do not allow any traffic from the outside in
  ingress:
  - {}
Using hubble observe we should now see that traffic is allowed and requests are forwarded.
Allow HTTP traffic to a specific domain
Running curl -I www.microsoft.com will still timeout. Using hubble observe we can investigate who is trying to talk to whom.

To make allow and deny rules easier to understand I prefer to use fully qualified domain names (FQDNs). For the next person to understand what is going on it is easier to understand that a rule allows traffic to www.microsoft.com rather than 80.67.94.7.
apiVersion: "cilium.io/v2"
kind: CiliumNetworkPolicy
metadata:
  name: "locking-down-alpine"
spec:
  endpointSelector:
    matchLabels:
      app: alpine
  egress:
  - toEndpoints:
    - matchLabels:
        "k8s:io.kubernetes.pod.namespace": kube-system
        "k8s:k8s-app": kube-dns
    toPorts:
      - ports:
        - port: "53"
          protocol: UDP
        # There is a challenge with alpine/musl and how a dns refused response is treated. This is
        # a not so elegant work around. As DNS is not simple I avoided going for a better solution for
        # now.
        # https://docs.cilium.io/en/stable/policy/language/#alpine-musl-deployments-and-dns-refused
        rules:
          dns:
            - matchPattern: "*"
  # allow traffic to a FQDN that
  - toFQDNs:
    # matches the pattern "*.microsoft.com"
    - matchPattern: "*.microsoft.com"
  ingress:
  - {}
Applying the rule kubectl apply -f ./locking-down-alpine.yml, running curl -I www.microsoft.com in the container again and using hubble observe to check if everything is working as expected.
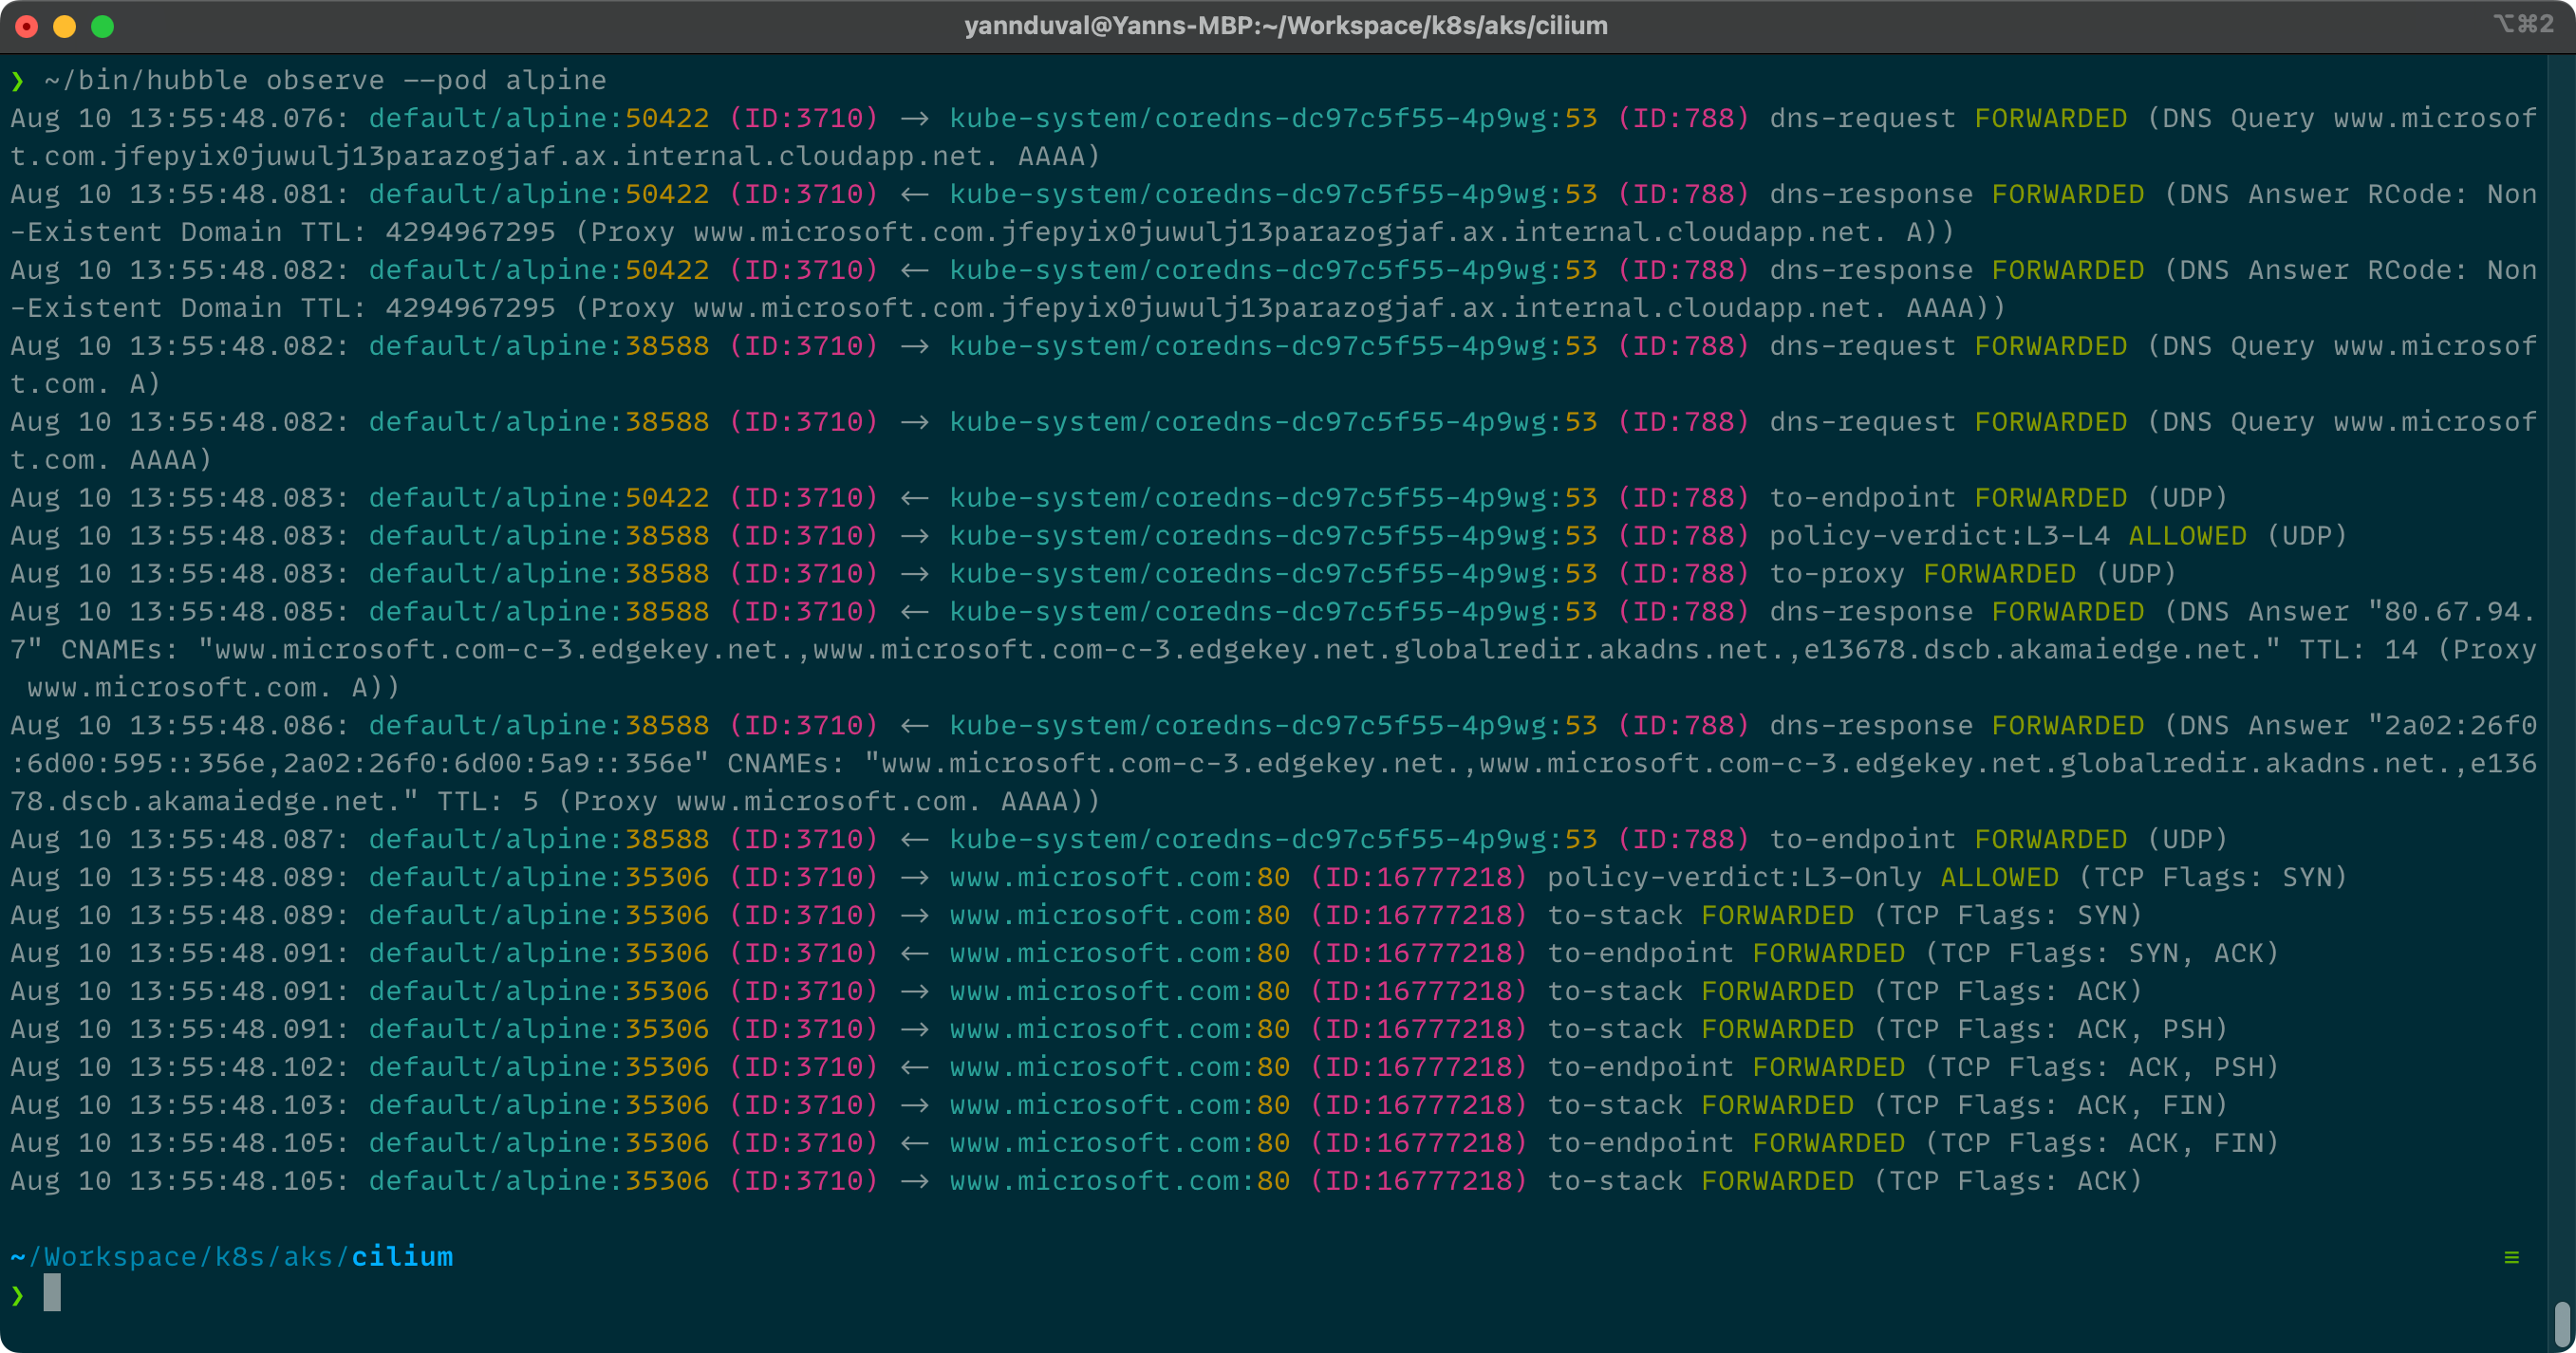
In case you are wondering why there are so many requests going back and forth between our pod and the target website, you can actually see the steps involved in a TLS handshake.
Thanks for making it this far
If you have any questions or suggestions, either contact me on twitter @devndive.